Wednesday, April 13, 2011

Getting started with Cluster/J - index search and table scans

This post follows the previous post, so set up the environment as described there.
In this example we will perform a full table scan (select * from my_data2) and an index scan (select * from my_data2 where userid=1).

The complete code is here from Severalnines.

Performing a full table scan (no search criteria)
Make sure you have records in the table my_data2.
To perform reads by primary key, we can just use Session::find(..), but here we will do a full table scan.
QueryBuilder qb = s.getQueryBuilder();

/*
* Run the query:
*/
List resultList = query.getResultList();
int count=0;

/*
* Loop over the results
*/

List resultList = query.getResultList();
int count=0;
for (MyData2 result: resultList) {
System.out.println(result.getFriendId());
count++;
}
That is it, if you run the example code, you will see the output.
Done reading X records in Y mssd

Performing a Index scan (search on part of the Primary Key)

The following snippet shows how to setup a EQUAL-filter:
/*
* We want to compare userid=1 (select * from my_data2 where userid=2)
*/
QueryBuilder qb = s.getQueryBuilder();
QueryDomainType dobj = qb.createQueryDefinition(MyData2.class);
/*
* Create a filter, we call this filter 'user_id_filter'
*/

PredicateOperand param = dobj.param("user_id_filter");
/*
* Set the column database column you want to filter on.
* Note: The setting dobj.get("userId") is really strange.
* In the table the column in the database is called userid, and in MyData2.
* The documentation of Cluster/J is very bad here, but
* the getter/setter are getUserId/setUserId, and you have to
* take the word after the get/set (in this case UserId) and change the first
* letter to lower case :(
*/
PredicateOperand column = dobj.get("userId");

/**
* Perform an equal compare
* we want to compare userid=1
*/

Predicate compare=column.equal(param);
dobj.where(compare);

Query query = s.createQuery(dobj);

/*
* Bind the search value to the filter
*/
query.setParameter("user_id_filter", new Long(1));

/*
* Run the query:
*/
List resultList = query.getResultList();
int count=0;

/*
* Loop over the results
*/
for (MyData2 result: resultList) {
System.out.println(result.getFriendId());
count++;
}
That is it for this time. I hope the clusterj documention will become better.

Getting started with Cluster/J - inserts (combined PK)

This post follows the previous post, so set up the environment as described there.
In this example we will have a slightly different table with a combined PK.
The complete code is here.

Create the table

The first thing we should do is to create the table we need for this example:
CREATE TABLE `my_data2` (
`userid` bigint(20) NOT NULL DEFAULT '0',
`friendid` bigint(20) NOT NULL DEFAULT '0',
`data` varbinary(255) DEFAULT NULL,
`last_updated` timestamp NOT NULL DEFAULT CURRENT_TIMESTAMP ON UPDATE CURRENT_TIMESTAMP,
PRIMARY KEY (`userid`,`friendid`)
) ENGINE=ndbcluster DEFAULT CHARSET=latin1
/*!50100 PARTITION BY KEY (userid) */

Mapping table to Java Interface
An interfae describing each table is needed. You annotate the code with @PrimaryKey and @Column do denote if the names of columns and the column names.
The only difference here is that you need to annotate all primary key columns with @PrimaryKey.
import com.mysql.clusterj.annotation.Column;
import com.mysql.clusterj.annotation.Index;
import com.mysql.clusterj.annotation.PersistenceCapable;
import com.mysql.clusterj.annotation.PrimaryKey;

@PersistenceCapable(table="my_data2")
@Index(name="id")
public interface MyData2 {

@PrimaryKey
long getUserId();
void setUserId(long i);

@PrimaryKey
long getFriendId();
void setFriendId(long i);

@Column(name = "data")
byte[] getData();
void setData(byte[] b);

@Column(name = "last_updated")
long getLastUpdated();
void setLastUpdated(long ts);
}

Performing an insert

Populate the fields in the object, and make it persistent. Don't forget to set all primary key columns or you will get a ClusterJException.
MyData my_data=s.newInstance(MyData.class);
/**
* Set the data on the object
*/
my_data.setUserId(i);
my_data.setFriendId(i);
my_data.setData(data);
my_data.setLastUpdated(System.currentTimeMillis());
/**
* Persist the object */
s.makePersistent(my_data);
That is it, if you run the example code, you will see the output.
Done inserting 100 records in X ms

Getting started with Cluster/J - inserts

Cluster/J is a the Java direct API to MySQL Cluster which means it bypasses the MySQL Server and executes requests directly on the data nodes of MySQL Cluster. This gives very good performance (typically >2x faster than SQL) and low latency.

In this blog I will present how to get started and how to do simple lookups.

The complete source code (actually a bit extended to show batching) for this example can be found at Severalnines (here). The code you will see below is just snippets.

Environment

To start with you need MySQL Cluster up and running.
For development on localhost then you can get a sandbox from Severalnines.
If you want to have a test/production environment you should you the Configurator for MySQL Cluster.

First of all you have to import the following Cluster/J jars into your project.
In Eclipse, on the project, do "Properties -> Java Build Path --> Add External JARs"
The JARs you need to import are typically located in /usr/local/mysql/share/java/ (if you have installed MySQL Cluster in this location - this is the default location used by Severalnines).

You also need to set the JVM configuration in order to point out the libndbclient library :
-Djava.library.path=/usr/local/mysql/lib/ -Xms128m -Xmx512m

Create the table


The first thing we should do is to create the table we need for this example:
CREATE TABLE `my_data` (
`id` bigint(20) NOT NULL AUTO_INCREMENT,
`data` varbinary(255) DEFAULT NULL,
`last_updated` timestamp NOT NULL DEFAULT CURRENT_TIMESTAMP ON UPDATE CURRENT_TIMESTAMP,
PRIMARY KEY (`id`) ) ENGINE=ndbcluster DEFAULT CHARSET=latin1

Mapping table to Java Interface
An interfae describing each table is needed. You annotate the code with @PrimaryKey and @Column do denote if the names of columns and the column names.
public interface MyData {     

@PrimaryKey
long getId();
void setId(long i);

@Column(name = "data")
byte[] getData();
void setData(byte[] b);

@Column(name = "last_updated")
long getLastUpdated();
void setLastUpdated(long ts);
}
Setting up the connection to MySQL Cluster

Properties p = new Properties();
p.setProperty("com.mysql.clusterj.connectstring", "localhost:1186");
p.setProperty("com.mysql.clusterj.database", "test");
SessionFactory sf=ClusterJHelper.getSessionFactory(p);
Creating a Session

The SessionFactory provides Sessions. On a session instance you can do a couple of things, e.g, makePersistent, updatePersistent, and find.
/**
* Sessions are not thread safe!
*/
Session s = sf.getSession();

Performing an insert

Populate the fields in the object, and make it persistent.
MyData my_data=s.newInstance(MyData.class);
/**
* Set the data on the object
*/

my_data.setId(i);
my_data.setData(data);
my_data.setLastUpdated(System.currentTimeMillis());
/**
* Persist the object */
s.makePersistent(my_data);
That is it, if you run the example code, you will see the output.
Done inserting 1000 records in 230 ms

Tuesday, April 12, 2011

(UC2011) BOF - Setting up MySQL Cluster on EC2

Severalnines will host a BOF at 7pm in Ballroom A, Tuesday 04/12.

After a succesful cluster tutorial we will demo how to use Severalnines Configurator to deploy MySQL Cluster on EC2 on X computers using one command (deploy.sh), complete with monitoring and management.

See you there!


Monday, April 11, 2011

Setting up Multi-master and read slaves using Severalnines


Read the detailed replication tutorial instead.


This tutorial shows how you can use the 
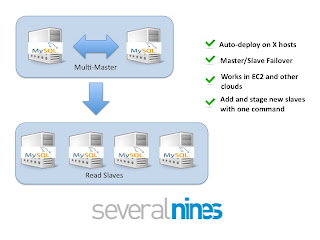
Severalnines Configurator for MySQL Replication to deploy a Multi-master replication setup, and install ClusterControl.

When the deployment is finished you have a set of tools to manage and monitor replication, as well as to add new slaves, and to perform failover.
You can choose:
  • if you wish also setup bi-directional replication between the masters
  • the number of slaves you wish to connect to the master
  • whether you want to use MySQL 5.5.10 or Percona latest stable
  • Handlersocket (percona) or Semi-sync replication (MySQL 5.5)
  • cloud provider (on premise/EC2/Rackspace)
When deployed you can easily perform tasks as:
  • Add new slaves
  • Failover
  • View replication health information
  • Stop/start replication links
  • Stage slaves
The Configurator for MySQL Replication is a wizard-like application and you have to enter details about the setup you want to have. When this is done you will get a tar.gz that contains the deployment and management scripts.

ClusterControl

The deployment process will also install ClusterControl which is a set of monitoring agents and functionality to manage the database installation. The agents are deployed on each server and collects host information and information from the local MySQL server a particular agent is monitoring (such as replication statistics and status information).

One server (either a standalone or one that will be part of the Replication cluster) is denoted the ClusterControl server. It is holding a database, CMON DB, that contains data about the monitored hosts, and the reporting data from the local agents is stored in this database.

Moreover, the ClusterControl server exposes a web interface that can be used to graphically see the health of the replication cluster (after the deployment is done, take a web browser and point it to http://clustercontrolserver/cmon :

We are in the process of adding a Query Analyzer and shaping up the web interface.

Installation
When you have finished the wizard you get a package that you should deploy on the ClusterControl server:
tar xvfz s9s-mysql-55.tar.gz
cd s9s-mysql-55/mysql/scripts/install
./deploy.sh

The 'deploy.sh' script will create data directories, install initd scripts, create mysql users, apply database GRANTs (those you defined in the Configurator), and install ClusterControl.

Starting Replication and basic examples


After having executed deploy.sh should do:
cd s9s-mysql-55/mysql/scripts/
./list-servers.sh -a
master : 10.48.207.130 [ up]
master : 10.48.139.24 [ up]
slave : 10.49.122.56 [ up]
slave : 10.49.110.183 [ up]
To verify the mysql servers are running and then:
cd s9s-mysql-55/mysql/scripts/
./start-repl.sh --master -i 1 -c

The command above will do a CHANGE MASTER (-c) and start replication from MySQL Server 1 to MySQL Server 2.

This step is not automated since you may want to start bi-directional replication between the masters. In that case you do:
./start-repl.sh --master -a -c

The slaves are then started with:
./start-repl.sh --slave -a -c
Which means, start all slaves (-a) and change master on those slaves.

Then you can run
./repl-status.sh  -a
serverid master_host -->slave_host status master_status slave_status [binlog|m_pos|exec_pos|lag]
1 10.48.207.130 10.48.139.24 ok binlog.000005:107 binlog.000005| 107| 107| 0
2 replication not activated - you must start replication on this link.
--- slaves follows ---
3 10.48.139.24 10.49.122.56 ok binlog.000005:107 binlog.000005| 107| 107| 0
4 10.48.139.24 10.49.110.183 ok binlog.000005:107 binlog.000005| 107| 107| 0

We got two masters, and the master with server-id=1 replicates to server-id=2, and the master on server-id=2 replicates to the slaves (3 and 4).

Now we are ready to provision data
./mysql.sh -h 10.48.207.130 -ppassword

mysql> create table t1 (id integer auto_increment primary key, data varchar(255))engine=innodb;
Query OK, 0 rows affected (0.02 sec)
mysql> insert into t1(data) values('hello');
And we can check the replication status:
ubuntu@ip-10-49-122-115:~/s9s-mysql-55/mysql/scripts$ ./repl-status.sh -a
serverid master_host -->slave_host status master_status slave_status [binlog|m_pos|exec_pos|lag]
1 10.48.207.130 10.48.139.24 ok binlog.000005:494 binlog.000005| 494| 494| 0
2 replication not activated - you must start replication on this link.
--- slaves follows ---
3 10.48.139.24 10.49.122.56 ok binlog.000005:485 binlog.000005| 485| 485| 0
4 10.48.139.24 10.49.110.183 ok binlog.000005:485 binlog.000005| 485| 485| 0


Good luck and don't hesitate to contact us at feedback@severalnines.com if you have any problems or whatever it may be. You can also book a demo this if you want to know more.

Friday, April 08, 2011

Severalnines launch customer focused website

I am glad to announce our brand new website today (www.severalnines.com).

The goal of the company is to make it easy for database developers to build their clustered database platforms, either on-premise or in the cloud.

We invite you to explore the new resources on the website (white papers, videos, new configurator for MySQL Replication, new cluster configurator with cloud options, etc.).