Tuesday, November 28, 2006

Updating a counter in different ways

In MySQL Cluster a statement like

update t1 set counter=counter+1 where pk=1

can be executed in a few different ways with great difference in performance.

If we do it from the MySQL server then the update is implemented as:

read_ex(counter) ; //one round trip to MySQL Cluster, read with exclusive lock
counter++
update(counter); //one round trip to MySQL Cluster, update - write back


If we are using the NDBAPI (Cluster Direct API) we could implement it as above as well, but for the operation above, the NDBAPI offers a way of performing the update in just one round trip! This can be done using Interpreted Programs, which are instructions defined in your NDBAPI application and upon execute, sent to the ndbd kernel and executed there. Cool. What I will show you here is how to do an update using the interpreted program, which is called an interpreted update.

In order to illustrate the impact of round-trips (and the mysql server) I did a simple test on my laptop.

The statement

update t1 set counter=counter+1 where pk=X

was implemented in
  1. Java using Connector/J to talk to the MySQL server
  2. NDBAPI as a read_ex(counter), counter++, update(counter)
  3. NDBAPI as an interpreted update
I setup a two node cluster and created a table:

create table t1(pk integer primary key, counter integer not null) engine=ndb;

and inserted some tuples.

Thereafter I ran the three tests above by looping 100 000 times updating the counter of a random tuple. The diagram below show the average time for performing an update in each of the three cases:

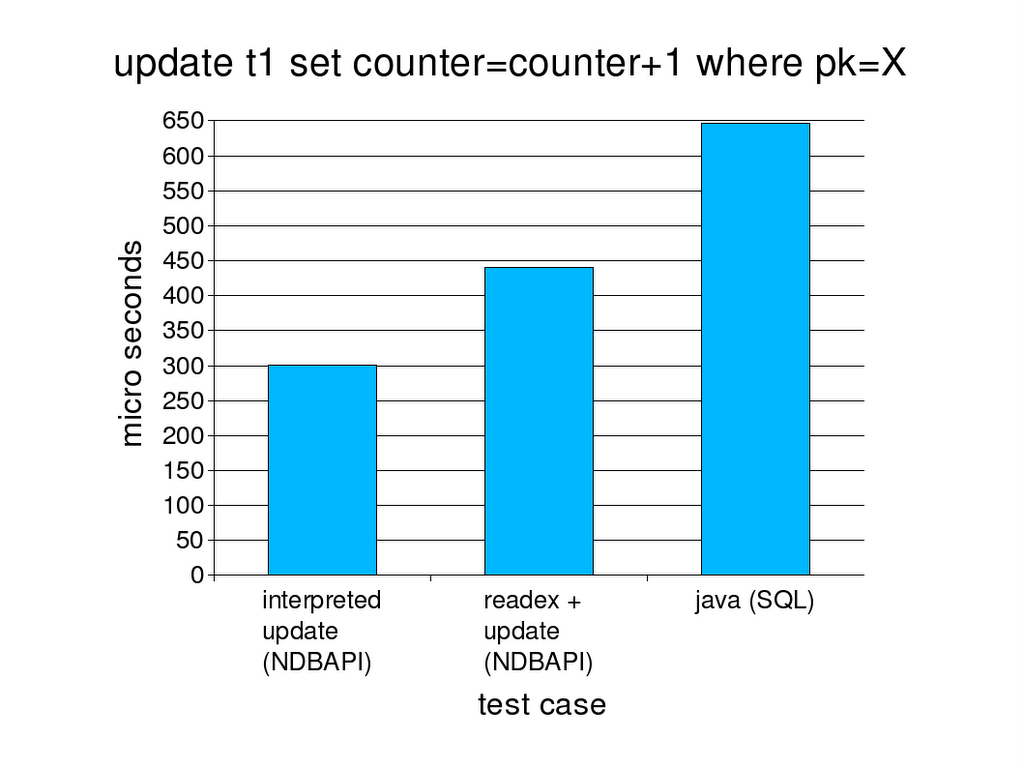
So, there are many micro seconds to gain and if we can avoid unnecessary round trips, let's do so!

Here is the code snippet for doing an interpreted update (error handling is intentionally left out):


unsigned int inc=1;
unsigned int pk=1;

NdbTransaction * t = ndb->startTransaction();

NdbOperation * op = t->getNdbOperation("t1");
//define the operation to be an interpreted update
op->interpretedUpdateTuple();

op->equal("pk",(const char*)pk);
// increment the value of counter with inc
op->incValue("counter", inc);

t->execute( NdbTransaction::Commit, NdbTransaction::AbortOnError, 1);
t->close();

Tuesday, October 31, 2006

NdbScanFilter

Sometimes the NDBAPI is not perhaps the most straightforward. This might be useful if you are struggling with scan filters (filtering tuples in the ndbd kernel, like engine-condition-pushdown) in combination with strings. Please have a look at my previous blog about how to use strings in the NDBAPI.

If you are using string daratypes with the NdbScanFilter::COND_EQ then the following rules applies:
  • VARCHAR and VARBINARY strings must have their length prepended (1 or 2 bytes)
  • CHAR must be space padded
  • BINARY must be null byte padded
However, for NdbScanFilter::COND_LIKE the following applies:
  • VARCHAR and VARBINARY must NOThave the lenght prepended!
  • CHAR must NOT be space padded
  • BINARY must NOT be null byte padded
Many thanks to Pekka (MySQL) and Jim Dowling (MySQL) on this subject.

Monday, October 30, 2006

Using CHAR/VARCHAR data types in NDBAPI

Many people have problem how to use the string data types (char/varchar) from the NDBAPI. Here I explain how you can use them.

First of all, let's create a table we can use as an example:

CREATE TABLE `t1` (
`a` int(11) NOT NULL,
`b` char(64) DEFAULT NULL,
`c` varchar(255) DEFAULT NULL,
`d` varchar(256) DEFAULT NULL,
PRIMARY KEY (`a`)
) ENGINE=ndbcluster DEFAULT CHARSET=latin1;


CHAR

In the MySQL server CHARs are space padded to the length of the CHAR.

Example:
insert into t1(a,b) values (1, 'mysql'); -- 'mysql' is 5 bytes long.

The MySQL server will now space-pad the string up to the length (in this case 64 bytes, given the character set used).

However, the NDBAPI does not respect this and does not care if it is space-padded, null-padded, or even 5-padded. But, if you want to be able to query the data that you have inserted/updated from the NDBAPI from the MySQL server, then you have to space-pad the data, because the MySQL Server requires this. Otherwise, the data will not display properly. So, in the NDBAPI you are responsible to space-pad the data!

From the NDBAPI, the insert above would be represented as (no error handling):

int a=1;
char b[64];
char str = "mysql";
memset(b,32,sizeof(b)); //ascii 32 is 'space'
memcpy(b,str,strlen(str));

NdbTransaction * t = ndb>startTransaction();
NdbOperation * op = t>getNdbOperation("t1");

op>insertTuple();
op>equal("a", (const char*)&a);
op>setValue("b",b);
t>execute(NdbTransaction::Commit, NdbTransaction::AbortOnError, 1);


Upon retrieval using the NDBAPI, you will have to strip the trailing spaces yourself (stripping is not shown in the example):


char b[65]; // length of column C + 1 for null character
memset(b,0,sizeof(b));

NdbTransaction * t = ndb>startTransaction();
NdbOperation * op = t>getNdbOperation("t1");
op>committedRead();
op>equal("a", (const char*)&a);
op>getValue("b",b));
t>execute(NdbTransaction::Commit, NdbTransaction::AbortOnError, 1);


cout << "a= " << a << "b=" << b << endl;


Will printout
a=1 b=mysql<59 trailing spaces>


VARCHAR

The VARCHARs data type stores the length of the string in the first byte (please not that different character sets exists with different storage requirements), followed by the actual string. There is an exception to this. If the VARCHAR is longer than 256 characters, then the first two bytes store the length of the string that follows.

Example:
insert into t1(a,c) values (2, 'mysql cluster'); -- 'mysql cluster' is 13 bytes long.

Internally, the length (13 bytes) is stored in the first byte, and then the string follows. In order to insert this string using the NDBAPI, then we will have to put together a buffer that stores the lenght in the first byte, and then the rest of the string. From the NDBAPI, the insert above would be represented as (no error handling):

char * str = "mysql cluster";
char c[strlen(str) + 1]; // +1 to store the length of the string. memset(c,0,sizeof(c));
memcpy(&c[1],str,strlen(str));
c[0]=strlen(str);
NdbTransaction * t = ndb>startTransaction();
NdbOperation * op = t>getNdbOperation("t1");
op>insertTuple();
op>equal("a", (const char*)&a);
op>setValue("c",c);
t>execute(NdbTransaction::Commit, NdbTransaction::AbortOnError, 1);

And to retrieve:

int a=2;
char c[255 + 1]; // length of column c + 1 byte for length

memset(c,0,sizeof(c));

NdbTransaction * t = ndb>startTransaction();
NdbOperation * op = t>getNdbOperation("t1");
op>committedRead();
op>equal("a", (const char*)&a);
op>getValue("c",c);
t>execute(NdbTransaction::Commit, NdbTransaction::AbortOnError, 1);

int len=c[0];
char c_real[len+1]; //+1B for null-terminator
c_real[len]=0;
memcpy(c_real, &c[1], len);

cout << "a= " << a << "c_real=" << c_real << endl;

Will printout:
a= 2 c_real= mysql cluster


LONG VARCHAR

If a VARCHAR is longer than 256B, then it is said to be a LONG VARCHAR. In a LONG VARCHAR the length is stored in the first two bytes, then the string follows. Below is an example on how to prepare a LONG VARCHAR in the NDBAPI.

insert into t1(a,d) values (3, 'how LONGVARCHAR works in the ndbapi);

would be represented as:

int a=3;
char * str = "how LONGVARCHAR works in the ndbapi";
int len = strlen(str);

char d[len + 2]; // +2B to store the length of the string.
memset(d,0,sizeof(d));
memcpy(&d[2],str, len);

d[0]=(char) ((len & 0x00FF))>>0;
d[1]= (char)((len & 0xFF00)>>8);

NdbTransaction * t = ndb>startTransaction();
NdbOperation * op = t>getNdbOperation("t1");
op>insertTuple();
op>equal("a", (const char*)&a);
op>setValue("d",d);
t>execute(NdbTransaction::Commit, NdbTransaction::AbortOnError, 1);


And to read it:

int a=3;

char d[256 + 2]; // length of column d + 2 byte for length

memset(d,0,sizeof(d));

NdbTransaction * t = ndb>startTransaction();
NdbOperation * op = t>getNdbOperation("t1");
op>committedRead();
op>equal("a", (const char*)&a);
op>getValue("d",d);
t>execute(NdbTransaction::Commit, NdbTransaction::AbortOnError, 1);

/*get the length of the string*/

int len = ((int) ((unsigned char) d[0]) + ((int) ((unsigned char) d[1]) << 8));
char d_real[len+1]; //+1B for null-terminator
d_real[len]=0;
memcpy(d_real, &d[2], len);

cout << "a= " << a <<" d_real=" << d_real << endl;


Will printout:
a= 3 d_real= how LONGVARCHAR works in the ndbapi


BINARY/VARBINARY/LONGVARBINARY

The same principles apply, but read the reference manual about the padding of BINARY/VARBINARY.

Monday, July 17, 2006

Writing NDBAPI programs - simple primary key operations (cntd)

We continue were we left off.
Using the basic structure from the last example where we implemented a simple query, let's have a look at how to do inserts, deletes, and updates based on the primary key.

First of all, use the same table structure as last time:

> mysql -u root test
and create the following table in the test database:


create table t1 ( a integer primary key, b integer, c char(20)) engine=ndb;
insert into t1 values(1, 1, 'hello');
insert into t1 values(2, 2, 'hello again');


Insert operation - insert into t1 values (3, 1, 'good bye');

Before we do the actual insert, let us prepare the data of the tuple we should insert:

int pk_a =3 ; //primary key
int b=1;
char * string = "good bye";

char c[20];
memset(c,32,sizeof(c)); // mysql requires chars to be space padded.
memcpy(c,string, strlen(string)); //copy string to spacepadded storage

If we do not space pad the string we want to insert, then it will be difficult to present the data in a correct way when accessing it using SQL from the MySQL server.

When we do an insert, we simply have to get an operation on the table we want to insert the tuple in and define it should be an insertTuple operation (for brewity I leave out some of the error checking, but the complete code is at the end of this) :

op->insertTuple();

After that we have to define the primary key we want to write:

op->equal("a", (const char*)&a);

and then for the rest of the non-pk columns:

op->setValue("b", (const char*)&b);

op->setValue("c", (const char*)c);


After that, we call commit the transaction as in the previous example. Quite simple!


Update operation - update t1 set b=4, c='mysql cluster rock' where a=2;

Again, we have to define the data for the tuple we want to update:

int pk_a =2; //primary key
int b=4;
char * string = "mysql cluster rocks";

char c[20];
memset(c,32,sizeof(c)); // mysql requires chars to be space padded.
memcpy(c,string, strlen(string)); //copy string to spacepadded storage

And we simple denote that this should be an update operation:

op->updateTuple();

After that we have to define the primary key of the tuple we want to update:

op->equal("a", (const char*)&a);

and then for the rest of the non-pk columns:

op->setValue("b", (const char*)&b);

op->setValue("c", (const char*)c);


And commit! Voila!


Delete operation - delete from t1 where a=1;

For the delete operation it is only necessary to give the primary key of the tuple we want to delete:

int pk_a =1; //primary key

And define that we want to do a delete operation:

op->deleteTuple();


After that we have to define the primary key of the tuple we want to update:

op->equal("a", (const char*)&a);

Commit!

Source code

(Compile and link as in previous examples)


#include
#include

#include


using namespace std;

/**
* prototypes
*/
int pk_read( Ndb * ndb);
int pk_insert( Ndb * ndb);
int pk_update( Ndb * ndb);
int pk_delete( Ndb * ndb);


int main()
{
ndb_init();
/**
* define a connect string to the management server
*/
char * connectstring = "localhost";

/**
* Create a Ndb_cluster_connection object using the connectstring
*/
Ndb_cluster_connection * conn = new Ndb_cluster_connection(connectstring);


/**
* Connect to the management server
* try 12 times, wait 5 seconds between each retry,
* and be verbose (1), if connection attempt failes
*/
if(conn->connect(12, 5, 1) != 0)
{
cout << "Unable to connect to management server." <<>wait_until_ready(30,0) <0) ndb =" new">init() != 0)
{
/**
* just exit if we can't initialize the Ndb object
*/
return -1;
}


if (pk_read( ndb ) < a="1;" pk_a =" 1;" b="0;" trans =" ndb-">startTransaction();

/**
* If there is an error then we should check the
* calling object to find out what the problem is.
* The error is stored in an NdbError struct and contains
* an error message, error code etc.
* Later on, we will do more elaborate error handling, but for
* now we will just print out the error message!
*/
if ( trans == 0)
{
NdbError err = ndb->getNdbError();
cout << "err code: " << op =" trans-">getNdbOperation("t1");

/**
* if op == 0 then we have to check the error.
* The error is stored at the parent in call stack.
* We also have to close the transaction since it is no longer
* usable!!
*/
if ( op == 0)
{
trans->close();
NdbError err = trans->getNdbError();
cout << "err code: " <<>committedRead();


/**
* Define the primary key!
*/

if (op->equal("a", (const char*)&pk_a) <>close();
NdbError err = op->getNdbError();
cout << "err code: " <<>getValue("b", (char*)&b) == 0)
{
trans->close();
NdbError err = op->getNdbError();
cout << "err code: " <<>getValue("c", c) == 0)
{
trans->close();
NdbError err = op->getNdbError();
cout << "err code: " <<>execute(NdbTransaction::Commit,
NdbTransaction::AbortOnError,
1) <>close();

/**
* If there is an error, it is stored in NdbError.
*/
NdbError err = trans->getNdbError();
cout << "err code: " <<>close();


/**
* print out the result:
*/

cout << "b= " << c= " << c << endl; return 0; } /** * This function implements * insert into t1 values (3, 1, 'good bye'); */ int pk_insert(Ndb * ndb) { /** * Define the tuple to insert: */ int pk_a =3 ; //primary key int b=1; char * string = " trans =" ndb-">startTransaction();
if ( trans == 0)
{
NdbError err = ndb->getNdbError();
cout << "err code: " << op =" trans-">getNdbOperation("t1");
if ( op == 0)
{
trans->close();
NdbError err = trans->getNdbError();
cout << "err code: " <<>insertTuple();


/**
* Define the primary key!
*/

if (op->equal("a", (const char*)&pk_a) <>close();
NdbError err = op->getNdbError();
cout << "err code: " <<>setValue("b", (const char*)&b) <>close();
NdbError err = op->getNdbError();
cout << "err code: " <<>setValue("c", (const char*)c) <>close();
NdbError err = op->getNdbError();
cout << "err code: " <<>execute(NdbTransaction::Commit,
NdbTransaction::AbortOnError,
1) <>close();

/**
* If there is an error, it is stored in NdbError.
*/
NdbError err = trans->getNdbError();
cout << "err code: " <<>close();

return 0;
}


/**
* This function implements
* update t1 set b=4, c='mysql cluster rocks' where a=2;
*/
int pk_update(Ndb * ndb)
{
/**
* Define the tuple to insert:
*/
int pk_a =2 ; //primary key
int b=4;
char * string = "mysql cluster rocks";

char c[20];
memset(c,32,sizeof(c)); // mysql requires chars to be space padded.
memcpy(c,string, strlen(string)); //copy string to spacepadded storage


NdbTransaction * trans = ndb->startTransaction();
if ( trans == 0)
{
NdbError err = ndb->getNdbError();
cout << "err code: " << op =" trans-">getNdbOperation("t1");
if ( op == 0)
{
trans->close();
NdbError err = trans->getNdbError();
cout << "err code: " <<>updateTuple();


/**
* Define the primary key!
*/

if (op->equal("a", (const char*)&pk_a) <>close();
NdbError err = op->getNdbError();
cout << "err code: " <<>setValue("b", (const char*)&b) <>close();
NdbError err = op->getNdbError();
cout << "err code: " <<>setValue("c", (const char*)c) <>close();
NdbError err = op->getNdbError();
cout << "err code: " <<>execute(NdbTransaction::Commit,
NdbTransaction::AbortOnError,
1) <>close();

/**
* If there is an error, it is stored in NdbError.
*/
NdbError err = trans->getNdbError();
cout << "err code: " <<>close();

return 0;
}


/**
* This function implements
* delete from t1 where a=1
*/
int pk_delete(Ndb * ndb)
{
/**
* Define the tuple to delete:
*/
int pk_a =1 ; //primary key


NdbTransaction * trans = ndb->startTransaction();
if ( trans == 0)
{
NdbError err = ndb->getNdbError();
cout << "err code: " << op =" trans-">getNdbOperation("t1");
if ( op == 0)
{
trans->close();
NdbError err = trans->getNdbError();
cout << "err code: " <<>deleteTuple();


/**
* Define the primary key!
*/

if (op->equal("a", (const char*)&pk_a) <>close();
NdbError err = op->getNdbError();
cout << "err code: " <<>execute(NdbTransaction::Commit,
NdbTransaction::AbortOnError,
1) <>close();

/**
* If there is an error, it is stored in NdbError.
*/
NdbError err = trans->getNdbError();
cout << "err code: " <<>close();

return 0;
}

Sunday, July 09, 2006

Writing NDBAPI programs - simple primary key operations

Last time we looked at how to connect to MySQL Cluster using the NDBAPI. This time we will look into how to implement simple primary key operations.
First of all we need a table to operate on. Connect a mysql client to the MySQL server:
> mysql -u root
and create the following table in the test database:

create table t1 ( a integer primary key, b integer, c char(20)) engine=ndb;

Insert some data into it:

insert into t1 values(1, 1, 'hello');
insert into t1 values(2, 2, 'hello again');

On this table we then want to issue the query:

SELECT b,c FROM t1 WHERE a=1;

expressed in the NDBAPI.


Before we start...


With Ndb_cluster_connection that we discussed in the last example, we were able to connect to MySQL Cluster.
However, we have not yet connected to a database. This service is provided in the Ndb class (note that the code excerps comes from the example code show at the end).

The line:

Ndb * ndb = new Ndb(conn, "test");

initialises an ndb object. The next thing to do is to initiliase it in order to setup some internal buffers for e.g transaction records etc :

if ( ndb->init() != 0)
{
//failure
}

Finally we are able to do we are able what we want to do!! Start transactions!!


Transactions..

In the NDBAPI, the recipe to perform a transaction is as follows:
  1. Start a transaction
  2. Define one or more operations within the transaction
  3. For each primary key operation define the primary key and what to read or write
  4. Execute the transaction
  5. Close the transaction
Transactions are represented in the class NdbTransaction. In order to start a transaction we have to get a transaction record (a pointer to a NdbTransaction object) from the Ndb object:

NdbTransaction * trans = ndb->startTransaction();
if (trans == 0) {/*failure*/ return -1;}

From the transaction record it is now possible to define an operation on a particular table:

NdbOperation * op = trans->getNdbOperation("t1");
if (op == 0) {/*failure*/ trans->close(); return -1;}

Please note that we have to close the transaction if anything fails.

Now we have to define what type of operation we want to do.
We can define the following types of operations on the primary key:
  • committedRead() - read w/o lock
  • readTuple(NdbOperation::LM_Read) - shared lock
  • readTuple(NdbOperation::LM_Exclusive) - exclusive lock
  • insertTuple()
  • deleteTuple()
  • updateTuple()
We want to do a committed read so we do:

op->committedRead();

At this stage we have now started a transaction, defined an committed operation on table t1, but we have not decided what we want to read! That is, we have to define the primary key! The primary key is defined by calling NdbOperation::equal (..) on all parts of the primary key (this must be done prior to any NdbOperation::setValue/getValue is called):

...
int pk_a=1; //define a variable to represent the primary key (where a=1)
...
if (op->equal("a", (const char*)&pk_a) trans->close(); return -1}

The above sets matches, by using the method equal , the column "a" to the value stored in pk_a. which the address is taken of and is casted to a const char*.

Then we want to project the corresponding values of column "b" and "c" which matches a=1. To do this we need to define storage, because we want to store the results somewhere so that we can use them!

int b=0;
char c[21]; //column size + 1 in order to get a null-terminated string
memset(c,0,sizeof(c)); //set it to 0

To read a value, we use NdbOperation::getValue(..). This method must be called after that the primary key has been defined. NdbOperation::getValue(..) takes a column name and an buffer to where to store the result. It will also return a NdbRecAttr object, which can be used to check if what we read was null, and actually it will also store the result, but it is preferred to store the result in a user defined buffer in order to avoid unnecessary copying of data.

So, to store the value of column "b" in the buffer "int b=0" is done as follows:

if (op->getValue("b", (char*)&b) == 0) { /*failure*/ trans->close(); return -1;}

Again, we have to get the adress of the storage and cast it to a char*.
Then to store the value of column "c" in the buffer "char c[21]" is done as follows:

if (op->getValue("c", (char*)&c) == 0) { /*failure*/ trans->close(); return -1;}

At this point we have now defined the query SELECT b,c FROM t1 WHERE a=1, but we have not yet executed it. Thus, nothing has been sent to the NDB nodes (data nodes) at this stage. In order to do that we have to call NdbTransaction::execute(...):

if( trans->execute(NdbTransaction::Commit,
NdbTransaction::AbortOnError,
1) { .. trans->close();...}

The above sends the transaction and all operations (currently one) to the transaction coordinator on one of the NDB nodes (data nodes). Futhermore, it says that the transaction should be committed (had we taken any locks, then they would be released), and abort if there is an error and the magical "1" means that NDBAPI will send it directly (remember ndb_force_send=1 in my.cnf?).

Example


cat ndbapi_pk_read.cpp :

#include <ndb_init.h>
#include <NdbApi.hpp>

#include <iostream>


using namespace std;

/**
* prototype for pk_read function
*/
int pk_read( Ndb * ndb);


int main()
{
ndb_init();
/**
* define a connect string to the management server
*/
char * connectstring = "localhost";

/**
* Create a Ndb_cluster_connection object using the connectstring
*/
Ndb_cluster_connection * conn = new Ndb_cluster_connection(connectstring);


/**
* Connect to the management server
* try 12 times, wait 5 seconds between each retry,
* and be verbose (1), if connection attempt failes
*/
if(conn->connect(12, 5, 1) != 0)
{
cout << "Unable to connect to management server." << endl;
return -1;
}

/**
* Join the cluster
* wait for 30 seconds for first node to be alive, and 0 seconds
* for the rest.
*/
if (conn->wait_until_ready(30,0) <0)
{
cout << "Cluster nodes not ready in 30 seconds." << endl;
return -1;
}


/**
* The first thing we have to do is to instantiate an Ndb object.
* The Ndb object represents a connection to a database.
* It is important to note that the Ndb object is not thread safe!!
* Thus, if it is a multi-threaded application, then typically each thread
* uses its own Ndb object.
*
* Now we create an Ndb object that connects to the test database.
*/

Ndb * ndb = new Ndb(conn, "test");


if (ndb->init() != 0)
{
/**
* just exit if we can't initialize the Ndb object
*/
return -1;
}


if (pk_read( ndb ) < 0)
{
cout << "failed to read tuple" << endl;
return -1;
}


return 0;

}


/**
* This function implements
* SELECT b,c FROM t1 WHERE a=1;
*/

int pk_read(Ndb * ndb)
{
/**
* Define a variable to hold the primary key
*/
int pk_a = 1;

/**
* Define storage for a and b
* b is an integer in t1
* c is a char(20) in t1.
* char's in the mysql are spacepadded to the end.
* In order to get a null terminated string, c has
* the length + 1 (21 bytes in total), and then memset is
* used to null-terminate the string.
* Varsized attributes are handled differently and we will
* look at this later.
*/
int b=0;
char c[21];
memset(c,0,sizeof(c));

/**
* Start a transaction.
* Later on the transaction must be closed, irrespectively of
* success or failure!
*/
NdbTransaction * trans = ndb->startTransaction();

/**
* If there is an error then we should check the
* calling object to find out what the problem is.
* The error is stored in an NdbError struct and contains
* an error message, error code etc.
* Later on, we will do more elaborate error handling, but for
* now we will just print out the error message!
*/
if ( trans == 0)
{
NdbError err = ndb->getNdbError();
cout << "err code: " << err.code << " err msg: "
<< err.message << endl;
return -1;
}

/**
* Get an operation record on table t1 to do a primary key operation
*/
NdbOperation * op = trans->getNdbOperation("t1");

/**
* if op == 0 then we have to check the error.
* The error is stored at the parent in call stack.
* We also have to close the transaction since it is no longer
* usable!!
*/
if ( op == 0)
{
trans->close();
NdbError err = trans->getNdbError();
cout << "err code: " << err.code << " err msg: "
<< err.message << endl;
return -1;
}

/**
* Define the operation to be a committed read (read w/o lock)
*/
op->committedRead();


/**
* Define the primary key!
*/

if (op->equal("a", (const char*)&pk_a) < 0)
{
trans->close();
NdbError err = op->getNdbError();
cout << "err code: " << err.code << " err msg: "
<< err.message << endl;
return -1;
}

if (op->getValue("b", (char*)&b) == 0)
{
trans->close();
NdbError err = op->getNdbError();
cout << "err code: " << err.code << " err msg: "
<< err.message << endl;
return -1;
}
if (op->getValue("c", c) == 0)
{
trans->close();
NdbError err = op->getNdbError();
cout << "err code: " << err.code << " err msg: "
<< err.message << endl;
return -1;
}


/**
* Now we have defined a transaction consisting of
* one operation. It is of course possible to define
* many operations in one transaction that either read
* from the same table or from other tables. This is
* called batching and is very efficient.
* It is important to know that nothing (absolutely nothing)
* has been sent to the ndbd nodes at this stage and we do
* not have anything in the result buffers.
* In order to send the transaction to ndbd, we have to call
* execute!
* execute can be called in many different ways (we will also
* look at them at a later stage), but this particular
* execute does a commit of the transaction and aborts if anything
* goes wrong. Since we only do a committed read, the commit will not commit
* any changes or release any locks, but a committed transaction is
* "finished" and the only thing we can do then is to call close on
* the transaction, which we must do, irrespectively of success or failure!
*/

if( trans->execute(NdbTransaction::Commit,
NdbTransaction::AbortOnError,
1) < 0)
{
/**
* The transaction must always be closed!
*/
trans->close();

/**
* If there is an error, it is stored in NdbError.
*/
NdbError err = trans->getNdbError();
cout << "err code: " << err.code << " err msg: " << err.message << endl;
return -1;
}
/**
* The transaction must always be closed!
*/
trans->close();


/**
* print out the result:
*/

cout << "b= " << b << " c= " << c << endl;

return 0;
}


Compile it:

g++ -c -Wall -fno-exceptions -I/home/johan/mysql/include/ -I/home/johan/mysql/include/ndb -I/home/johan/mysql/include/ndb/ndbapi ndbapi_pk_read.cpp

g++ ndbapi_pk_read.o -L/home/johan/mysql/lib -lndbclient -lmysys -lmystrings -lpthread -o ndbapi_pk_read

Friday, June 30, 2006

Writing NDBAPI programs - connecting to MySQL Cluster

In this first little lesson we will learn how to connect an NDBAPI program to connect to MySQL Cluster. Start a X node cluster with atleast two or three [API] or [MYSQLD] slots so that you can connect a mysql server and the example program.

Before running these examples, please read the documentation on the NDBAPI classes and methods that are used!

The first example program (listed below), ndbapi_connect.cpp illustrates how to connect to MySQL Cluster.

> cat ndbapi_connect.cpp

#include
#include

#include


using namespace std;

int main()
{
ndb_init();
/**
* define a connect string to the management server
*/
char * connectstring = "localhost";

/**
* Create a Ndb_cluster_connection object using the connectstring
*/

Ndb_cluster_connection * conn = new Ndb_cluster_connection(connectstring);


/**
* Connect to the management server
* try 12 times, wait 5 seconds between each retry,
* and be verbose (1), if connection attempt failes
*/

if(conn->connect(12, 5, 1) != 0)
{
cout << "Unable to connect to management server." << face="courier new"> return -1;
}

/**
* Join the cluster
* wait for 30 seconds for first node to be alive, and 0 seconds
* for the rest.
*/

if (conn->wait_until_ready(30,0) <0)
{
cout << "Cluster nodes not ready in 30 seconds." << endl;
return -1;
}

cout << "Congratulations, you have connected to MySQL Cluster!" << endl;
cout << "run 'ndb_mgm -e \"show\" to see that your app is connected! " << endl << "Press any key to exit" << endl;

char data;
read (0, &data, 1);

return 0;
}


To build this I do:
g++ -c -I/home/johan/mysql/include/ -I/home/johan/mysql/include/ndb -I/home/johan/mysql/include/ndb/ndbapi ndbapi_connect.cpp

and to link:
g++ ndbapi_connect.o -L/home/johan/mysql/lib -lndbclient -lmysys -lmystrings -lpthread -o ndbapi_connect

and to run:
./ndbapi_connect

It should print out:

Congratulations, you have connected to MySQL Cluster!
run 'ndb_mgm -e "show" to see that your app is connected!
Press any key to exit

Congratulations, you have now written your first NDBAPI example.
Next time we will look how to implement a simple query, SELECT b,c FROM t1 WHERE a=1 , using the NDBAPI.

Writing NDBAPI programs - getting our environment

The first thing we have to do, before starting with any examples, is to setup our environment.

The linux kernel I am using is ( I am using Ubunto 6.06):
Linux stingray 2.6.15-25-386 #1 PREEMPT Wed Jun 14 11:25:49 UTC 2006 i686 GNU/Linux

The compiler I am using is ( g++ -v):
...
gcc version 4.0.3 (Ubuntu 4.0.3-1ubuntu5)

Another good thing to have is e.g. the NDBAPI documentation.
For this I will use MySQL 5.0.22, but the steps are the same for 5.1.X
  1. Download the source distribution of MySQL 5.0.22
  2. tar xvfz mysql-5.0.22.tar.gz
  3. cd mysql-5.0.22
  4. ./configure --with-ndbcluster --with-ndb-docs
  5. cd ndb/docs (in 5.1.X it is 'storage/ndb/docs')
  6. make
Now you have html documentation of the ndbapi, if you have got all the necessary things (like doxygen) installed to generate the documentation.
You will also get the documentation for the management api (mgmapi), but it will be covered later here.

Finally, I download the binary distribution of MySQL 5.0.22 and:
  1. cd /home/johan
  2. tar xvfz mysql-max-5.0.22-linux-i686-glibc23.tar.gz
  3. ln -s mysql-max-5.0.22-linux-i686-glibc23 mysql
Include files are located in:
mysql/include, mysql/include/ndb and mysql/include/ndb/ndbapi

Libraries are located in:
mysql/lib

Alright, I think we are good to go and continue with some examples. First of all how to connect an application to MySQL Cluster.

Sunday, June 25, 2006

Faster JOINs in MySQL Cluster 5.1 using Replication

Many of you have experienced performance problems with JOINs in MySQL Cluster. However, in MySQL 5.1, it is possible to address this using MySQL replication and create a read slave where the JOINs are performed.

It is possible to set a MySQL Cluster looking like this (very schematic):
To read more on how to setup the replication link beetween the Master and the Slave, see http://dev.mysql.com/doc/refman/5.1/en/replication.html .

The trick here is to make sure that the tables created using the NDBCluster engine are created on the slave MySQL server as MyISAM or in another storage engine more performant resolving JOINs.

This way you can now issue complex JOINs on the slave instead of on the cluster and the replication ensures that the changes you make on the NDBCluster tables will be replicated to the slave.


Unfortunately, it is not yet (will it ever be?) possible to let the Master MySQL server replicate its binlog to itself (into another database) in order to avoid the extra Slave MySQL server.

Writing NDBAPI programs

The most powerful and efficient way to access data stored in the NDB storage engine is to use the NDBAPI, a C++ API which gives you direct access to data stored in MySQL Cluster.

Instead of having to go through the MySQL server to access data, you can access the data directly from your C++ application. Why would you like to do this? There are some reasons:
  1. Data access with minimal overhead
  2. Flexibility - posssible to hand-optimize queries. You control exactly when you want to send data to NDB Cluster.
  3. Performance - Shorter response times, because of fewer network hops (no MySQL server as a proxy) and (1,2) above.
Typically, application developers that want soft realtime characteristics on data access use the NDBAPI, and use SQL (going through the MySQL server) for OAM type applications.

In this blog, I will try to show you how to start programming your own NDBAPI applications and I will illustrate this with simple examples. It will require that you have knowledge about C/C++.