Friday, June 27, 2008

ndb_restore tricks

With ndb_restore it is actually possible (talking MySQL Cluster 6.2 and 6.3 here, haven't looked at 5.0 for a long time) to restore a single table into a CSV file that can be loaded using LOAD DATA INFILE.

This can be useful if e.g:
  1. You want to extract data from a cluster table and load it into MyISAM/Innodb. This can be useful for reporting/data-mining purposes.
  2. You want to load data back into Cluster but into another table looking the same as the original table (not to spoil the original data) for some reason.
Number 2) could be used in scenarios where you want to upgrade the schema by e.g changing the column length of a char(10) to char(255) (not an online operation) and add a bunch of other stuff. Please note that add column is an online operation, changing the column length is not.

Here is an example on how you can do it generate a CSV file using ndb_restore.


I have the following setup:


Connected to Management Server at: localhost:1186
Cluster Configuration
---------------------
[ndbd(NDB)] 4 node(s)
id=3 @10.128.22.129 (mysql-5.1.24 ndb-6.3.15, Nodegroup: 0, Master)
id=4 @10.128.22.130 (mysql-5.1.24 ndb-6.3.15, Nodegroup: 0)
id=5 @10.128.22.129 (mysql-5.1.24 ndb-6.3.15, Nodegroup: 1)
id=6 @10.128.22.130 (mysql-5.1.24 ndb-6.3.15, Nodegroup: 1)

[ndb_mgmd(MGM)] 2 node(s)
id=1 @10.128.22.127 (mysql-5.1.24 ndb-6.3.15)
id=2 @10.128.22.128 (mysql-5.1.24 ndb-6.3.15)

[mysqld(API)] 37 node(s)
id=7 @10.128.22.127 (mysql-5.1.24 ndb-6.3.15)
id=8 @10.128.22.128 (mysql-5.1.24 ndb-6.3.15)
id=9 (not connected, accepting connect from any host)


I created two tables, t1, and t2 and filled them with some data. I will not show this step here.

First you need to take a backup:
  • ndb_mgm -e "start backup"
I have used the scripts generated by the Configuration Tool and do:
  • sh start-backup /tmp
The script aggregates the backups files generated by each individual data node (since the backup is distributed) to a central place. In this case /tmp on the host I run the script from.

I have the following backup files in /tmp/

[root@ps-ndb01 BACKUP-2008Jun27-162551]# pwd
/tmp/BACKUP-2008Jun27-162551
[root@ps-ndb01 BACKUP-2008Jun27-162551]# ls -al
total 136
drwxr-xr-x 2 root root 4096 Jun 27 16:43 .
drwxrwxrwx 5 root root 4096 Jun 27 16:25 ..
-rw-r--r-- 1 root root 13116 Jun 27 16:25 BACKUP-2-0.3.Data
-rw-r--r-- 1 root root 13620 Jun 27 16:25 BACKUP-2-0.4.Data
-rw-r--r-- 1 root root 14216 Jun 27 16:25 BACKUP-2-0.5.Data
-rw-r--r-- 1 root root 12312 Jun 27 16:25 BACKUP-2-0.6.Data
-rw-r--r-- 1 root root 11160 Jun 27 16:25 BACKUP-2.3.ctl
-rw-r--r-- 1 root root 52 Jun 27 16:25 BACKUP-2.3.log
-rw-r--r-- 1 root root 11160 Jun 27 16:25 BACKUP-2.4.ctl
-rw-r--r-- 1 root root 52 Jun 27 16:25 BACKUP-2.4.log
-rw-r--r-- 1 root root 11160 Jun 27 16:25 BACKUP-2.5.ctl
-rw-r--r-- 1 root root 52 Jun 27 16:25 BACKUP-2.5.log
-rw-r--r-- 1 root root 11160 Jun 27 16:25 BACKUP-2.6.ctl
-rw-r--r-- 1 root root 52 Jun 27 16:25 BACKUP-2.6.log
[root@ps-ndb01 BACKUP-2008Jun27-162551]#


As you see, there are one data file (.Data) for each data node where the backup came from.
Now I want to generate a CSV file containg only the data from table t1! Since the backup is from four data nodes I have to run ndb_restore four times, once for each backup file (3, 4, 5, 6).


[root@ps-ndb01 BACKUP-2008Jun27-162551]# ndb_restore --verbose=0 -c "localhost" --print_data -b 2 -n 3 --fields-enclosed-by="'" --fields-terminated-by=',' --tab=. . test t1
[root@ps-ndb01 BACKUP-2008Jun27-162551]# ndb_restore --verbose=0 -c "localhost" --print_data -b 2 -n 4 --fields-enclosed-by="'" --fields-terminated-by=',' --append --tab=. . test t1
[root@ps-ndb01 BACKUP-2008Jun27-162551]# ndb_restore --verbose=0 -c "localhost" --print_data -b 2 -n 5 --fields-enclosed-by="'" --fields-terminated-by=',' --append --tab=. . test t1
[root@ps-ndb01 BACKUP-2008Jun27-162551]# ndb_restore --verbose=0 -c "localhost" --print_data -b 2 -n 6 --fields-enclosed-by="'" --fields-terminated-by=',' --append --tab=. . test t1

What has happened now is that a file, t1.txt, has been generated containing:

[root@ps-ndb01 BACKUP-2008Jun27-162551]# cat t1.txt
'9','hello'
'10','hello'
'15','hello'
'3','hello'
'6','hello'
'7','hello'
'16','hello'
'2','hello'

Voila! This file can now be loaded using LOAD DATA INFILE...

About the flags used in the ndb_restore program:
--verbose=0 - restore silently
--print_data - print the data, do not restore to the Cluster
-b - backup-id, in this case backup-id=2
-n - id of the data node where the backup came from (in this case we have data nodes 3,4,5 and 6.
--tab - directory to write the csv file (in this case . which means the cwd).
--append - only used for the last three runs of the ndb_restore. This means that the data will be appended to t1.txt


Good luck,
j
Thursday, June 19, 2008

New version of the Dimensioning Toolkit

2009-07-15: The Dimensioning Toolkit has been replaced with sizer.

I have put up a new version of the Dimensioning Toolkit.
Now, there is a particular version for MySQL Cluster 6.2 and MySQL Cluster 6.3.

The reason for this split is that the libraries and include files are in different locations (include/ and lib/ in 6.2, but lib/mysql and include/mysql in 6.3).
I don't know why the build team changes this between versions (even builds) and so often... very annoying.

Anyways, follow the links to download:

Dimensioning Toolkit for MySQL Cluster 6.2
Dimensioning Toolkit for MySQL Cluster 6.3

Disk data tables

I got a few questions about how to configure the cluster for disk data.
The new version of the Dimensioning Toolkit does a better job calculating:
  • UNDO LOG file size
  • TABLESPACE size
  • UNDO Buffer size
What I write about below is taken into account in the Dimensioning Toolkit. Moreover, the things below only applies to disk data tables (read about the generic stuff about them in the reference manual).

UNDO LOG and UNDO BUFFER
Disk data tables make use of an UNDO log and an UNDO buffer.
The size of the undo log and the undo buffer is specified when you create the logfile group.

I recommend setting:
  • UNDO log size = 4 to 6 times the DataMemory, thus the same size as for the REDO log.
  • UNDO buffer size= 32M
The memory for the UNDO buffer is allocated from the SharedGlobalMemory, which is a parameter in the [ndbd default] section.
In order to have an UNDO buffer that is 32M, you need to set:

[ndbd default]
...
SharedGlobalMemory=256M
...

Current version of the Configuration Tool sets this value for you, and the Dimensioning Toolkit calculates the size of the UNDO log file for you.

In order to create a log file group with the specified values you then do:

CREATE LOGFILE GROUP lg ADD UNDOFILE 'undo1.dat'
INITIAL_SIZE=[4-6]*DataMemory (in MB) ##e.g DataMemory=1024M --> INITIAL_SIZE=6144M
UNDO_BUFFER_SIZE=32M
ENGINE=NDB;

For MySQL Cluster 6.2, it should be 6xDataMemory. For MySQL Cluster 6.3 it should be 4xDataMemory (this because 6.3 writes only two LCPs)


TABLESPACE
Next thing is to create a table space. A table space is a collection of one or more data files.
Benchmarks indicates it is better to have many smaller data files than one giant data file. This has to do with how the data nodes are handling open files (one thread for each open file). More files --> more threads...

Again, the Dimensioning Toolkit will calculate the total size you need for the table space, but you can later on add more data files online if you wish.

If you want to create a table space that is 1GB in size I would do like:

CREATE TABLESPACE ts_1
ADD DATAFILE 'data1.dat'
USE LOGFILE GROUP lg
INITIAL_SIZE=128M ##one data (data1.dat) file with size = 128M
ENGINE=NDB;

Then add more data files:

ALTER TABLESPACE ts_1 ADD DATAFILE 'data2.dat' INITIAL_SIZE=128M ENGINE=NDB;
...
ALTER TABLESPACE ts_1 ADD DATAFILE 'data10.dat' INITIAL_SIZE=128M ENGINE=NDB;


I intentionally over-allocated the size of the table space (10 x 128M).
Moreover, you can have one log file group, but one log file group can contain many undo files, and you can have many table spaces.

Recommendations
My recommendations are:
  • Use the Configuration Tool to generate a good config.ini. Even though you don't want to use the scripts, you can still use the config.ini. The config.ini it generates is state of the art and a great boiler plate!
  • Use the Dimensioning Toolkit to scope out how much RAM, Disk etc you need.
  • Use the resulting DataMemory/IndexMemory etc you got from the Dimensioning Toolkit in the Configuration Tool to nail a configuration that suits you.
Good luck!

Monday, June 16, 2008

Dimensioning Toolkit for MySQL Cluster

2009-07-15: The Dimensioning Toolkit has been replaced with sizer.

This blog presents a new toolkit to assist in Dimensioning of MySQL Cluster.
The toolkit consists of two parts:
  1. ndb_record_size
  2. a spreadsheet to assist in calculating the amount of storage needed etc.
The ndb_record_size and the spreadsheets can be downloaded here.

ndb_record_size is a program that calculates the amount of storage (IndexMemory, DataMemory, Disk space (for disk data table)) that is needed for a particular table in a database. The program takes into account the storage overhead needed when calculating the record size.

There are two versions of the spreadsheet, one for MySQL Cluster 6.2, and one for MySQL Cluster 6.3. The main difference is that the spreadsheet for MySQL Cluster 6.3 takes into account compression of LCP and Backups if you chose to enable that.

The spreadsheet uses the information given by ndb_record_size and you can determine how many data nodes you need, the amount of IndexMemory/DataMemory that is needed etc.

Please note that these tools are not Supported by MySQL Support. However, I have used them with a number of customers where they have proven very successful.

Compiling ndb_record_size

The ndb_record_size program needs to be compiled (let me know if problems exists on Supported platforms other than Linux) before we can use it:
  1. tar xvfz ndb_record_size.tgz
  2. cd ndb_record_size
  3. (edit the Makefile to change "INSTALL_DIR". If you are using the Configuration Tool, and are using the default INSTALL path there, you don't have to do anything)
  4. make

To run it:

> export LD_LIBRARY_PATH=/usr/local/mysql/mysql/lib/mysql:$LD_LIBRARY_PATH
> ./ndb_record_size

This will print out some help information how the program should be executed:
ndb_record_size <connect> <database> <table>
- <connect> - the host where the management server is running
- <database> - name of the database where the <table> is stored
- <table> - the name of the table to dimension

Before we can run the program to dimension the tables, we need to have the tables created in storage engine=ndb.

Migrating existing MyISAM/Innodb database

If you have an already existing database in MySQL (e.g in MYISAM, Innodb) that you would like to migrate to MySQL Cluster you can do:

>mysqldump --no-data > databasedump.sql
change the engine=MyISAM or engine=INNODB to engine=ndb, e.g by:
> cat databasedump.sql | sed -e 's/MyISAM/NDB/' > databasedump-ndb.sql
> use the mysql client and do "source databasedump-ndb.sq"

Provision database with reference data

Best practice using ndb_record_size is to provision the database with reference data.
The reason for this is to be able to calculate storage correctly needed by VAR* attributes.
If you have no reference data, then ndb_record_size will default to maximum length of the VAR* attribute.

E.g, if you have a column "email varchar(255)" then the size of the record will be calculated with email having a column length of 256B. However, in real-life an email address is e.g mostly often not that long, but the average could be actually be e.g only 64B.

If you populate using reference data, then ndb_record_size will calculate the size of the record with the average size for each varchar/varbinary attribute over max 1000 records.
If you have 5 records for reference data, it will average over those 5 records. If one record exists, it will take that.

Using reference data you will get more exact information on how much storage you will need!


Example run:

I have created four tables in mysql's "test" database:

CREATE TABLE `t1` (
`a` int(11) NOT NULL,
`b` bigint(20) DEFAULT NULL,
`c` char(21) DEFAULT NULL,
`d` varchar(22) DEFAULT NULL,
`e` bit(1) DEFAULT NULL,
PRIMARY KEY (`a`),
KEY `b` (`b`)
) ENGINE=ndbcluster DEFAULT CHARSET=latin1

and a few variants of that one. I have not inserted any reference data (bad practice).
I then run the ndb_record_size program in this table.

./ndb_record_size localhost test t1

Calculating storage cost per record for table t1:

--- WARNING! No reference data found for VAR*. Defaulting to max size..23 Bytes
Consider loading database with average data for exact measurement
--- Ordered Index found named (PRIMARY). Additional cost per record is = 16 bytes of DataMemory.
--- Ordered Index found named (b). Additional cost per record is = 16 bytes of DataMemory.

Record size (incl OH):
#Rows found=0 records (--A required)
#OrderedIndexes=2
#UniqueHashIndexes=0
#blob/text=0
DataMemory=137 bytes
IndexMemory=20 bytes
Diskspace=0 bytes


Appending the following to test.csv
test,t1,0,2,0,0,20,137,0

As you can see the ndb_record_size program recommends me to populate with average data/reference data in order to calculate a good size of the VAR* attribute. It also prints out how many ordered indexes, and unique indexes you have on this table.

Finally, ndb_record_size appends the storage required to a csv file called .csv
I run the program a couple of more times to size all the four tables I have created in the test database:

./ndb_record_size localhost test t2
./ndb_record_size localhost test t3
./ndb_record_size localhost test t4

I then look at the output of the test.csv file:

>cat test.csv
test,t1,0,2,0,0,20,137,0
test,t2,0,2,1,0,40,140,0
test,t3,0,0,0,0,20,179,0
test,t4,0,1,0,0,20,196,0

Using the dimensioning spreadsheet

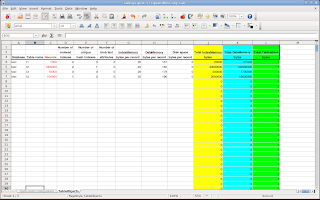
The information in the test.csv file is pasted/imported into the sizing spreadsheet.
As you see in the picture below, I have also added how many records I will have in each table.


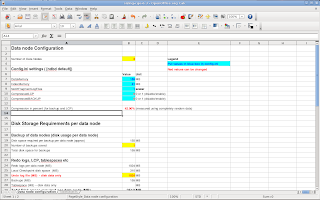
When you have added how many records you will have in each table then you can navigate to the tab "Data node configuration". What that tab looks like is shown below:


As you can see there are two fields, DataMemory and IndexMemory.
These fields (and NoOfFragmentLogFiles etc) are automatically derived from the data provided in the tab "TableObjects".

The values in "red" can be altered. Values in "blue" boxes should be transferred to the [ndbd default] section of the config.ini.

E.g, you can now change the number of data nodes (they must be even 2,4,6...) and the storage needed for each data node is then updated in the spreadsheet.
Thus, you can see how many data nodes you need to handle a particular database size.

When you have determined how many data nodes you need to have by checking that the "Total RAM per data node" and the "Total Disk space per data node" you can transfer these values into your config.ini file and restart the cluster.

If you have generated a configuration using the Configuration Tool then you can do like this:

1. cd mysqlcluster-XY
2. edit config/config.ini
3. update the config.ini and save and exit
4. If you have changed "NoOFragmentLogFiles" you must run (in order to recreate the redo log on disk with the new size)
4.1. sh rolling-restart-initial.sh
Or if you haven't:
4.2. sh rolling-restart.sh

The above operation is online, meaning you can have traffic while performing this step.

If you have changed the number of Data Nodes then it is not possible to update the configuration online (yet). You must generate a new configuration, e.g by using the Configuration Tool, with the correct number of data nodes! Don't forget to stop the old cluster before installing the new cluster!